
Webブラウザを自動操作するためのPythonライブラリとしてSeleniumパッケージが存在します。
本パッケージは、元々は自動テストのためのツールとして開発されましたが、現在はWebスクレイピングなどのWebブラウザの操作を中心に広く利用されています。
本記事では、Seleniumパッケージのインストール方法と簡単な使い方までを解説します。
Seleniumとは?
Seleniumパッケージは、Webブラウザを自動操作するためのPythonライブラリです。
プログラムからChromeやFirefoxなどを開き、ページ遷移・クリック・入力などを行えます。
Webスクレイピングや自動テストのシナリオ作成によく利用されます。
操作は人間がブラウザを使うのと同じ動作をシミュレートするため、JavaScriptで動くページにも対応することができます。
ブラウザの種類や動作モードを指定して柔軟に制御することができます。
こちらのページにSeleniumの歴史がまとめられています。
ソフトウェアの変遷が気になる方は参照してみてください。
Seleniumパッケージのインストール
まずはSeleniumパッケージをインストールします。
本記事をまとめる上で、実際に動かしている環境情報は以下となります。
- Windows 11 (64-bit)
- Python 3.13.0
- Chrome 138.0.7204.184(事前にChromeブラウザをインストール済み)
seleniumパッケージをインストールするには「pip install selenium」を実行します。
特に問題なくインストールが完了すると思います。
> pip install selenium
Collecting selenium
  Downloading selenium-4.34.2-py3-none-any.whl.metadata (7.5 kB)
  :
Downloading selenium-4.34.2-py3-none-any.whl (9.4 MB)
   ━━━━━━━━━━━━━━━━━━━━━━━━━━━━━━━━━━━━━━━━ 9.4/9.4 MB 5.8 MB/s eta 0:00:00
Downloading certifi-2025.8.3-py3-none-any.whl (161 kB)
Downloading trio-0.30.0-py3-none-any.whl (499 kB)
Downloading trio_websocket-0.12.2-py3-none-any.whl (21 kB)
Downloading typing_extensions-4.14.1-py3-none-any.whl (43 kB)
Downloading urllib3-2.5.0-py3-none-any.whl (129 kB)
Downloading cffi-1.17.1-cp313-cp313-win_amd64.whl (182 kB)
Downloading outcome-1.3.0.post0-py2.py3-none-any.whl (10 kB)
Downloading PySocks-1.7.1-py3-none-any.whl (16 kB)
Downloading wsproto-1.2.0-py3-none-any.whl (24 kB)
Downloading sortedcontainers-2.4.0-py2.py3-none-any.whl (29 kB)
Downloading pycparser-2.22-py3-none-any.whl (117 kB)
Installing collected packages: sortedcontainers, wsproto, urllib3, typing_extensions, pysocks, pycparser, outcome, certifi, cffi, trio, trio-websocket, selenium
  Attempting uninstall: urllib3
    Found existing installation: urllib3 2.3.0
    Uninstalling urllib3-2.3.0:
      Successfully uninstalled urllib3-2.3.0
  Attempting uninstall: typing_extensions
    Found existing installation: typing_extensions 4.12.2
    Uninstalling typing_extensions-4.12.2:
      Successfully uninstalled typing_extensions-4.12.2
  Attempting uninstall: certifi
    Found existing installation: certifi 2024.8.30
    Uninstalling certifi-2024.8.30:
      Successfully uninstalled certifi-2024.8.30
Successfully installed certifi-2025.8.3 cffi-1.17.1 outcome-1.3.0.post0 pycparser-2.22 pysocks-1.7.1 selenium-4.34.2 sortedcontainers-2.4.0 trio-0.30.0 trio-websocket-0.12.2 typing_extensions-4.14.1 urllib3-2.5.0 wsproto-1.2.0
Seleniumの簡単な使い方
非常に簡単なサンプルは、こちらのページの「Example 0」や「Example 1」あたりでしょうか。
まずはExample 1を動かしてみましょう。
Chromeドライバを利用する場合
事前にChromeブラウザをインストールしていたため、以下のコードで問題なく動作しました。
from selenium import webdriver
from selenium.webdriver.common.by import By
driver = webdriver.Chrome()
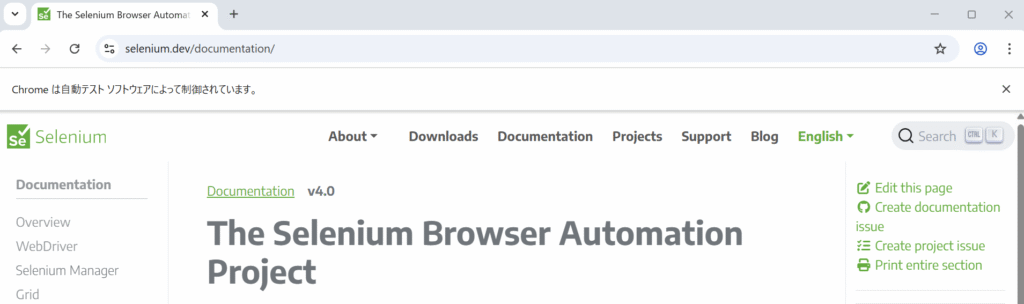
driver.get('https://selenium.dev/documentation')
assert 'Selenium' in driver.title
elem = driver.find_element(By.ID, 'm-documentationwebdriver')
elem.click()
assert 'WebDriver' in driver.title
driver.quit()コード解説
driver = webdriver.Chrome()Chromeブラウザを起動します。
以下のような真っ白なブラウザが起動してきます。

driver.get('https://selenium.dev/documentation')URLに指定されたページを読み込みます。
ブラウザ上でもページが表示されます。
assert 'Selenium' in driver.titleassert文は、プログラムの実行中に特定の条件が真であることを確認するためのデバッグツールです。
条件が偽の場合に、AssertionError例外を発生させ、プログラムを停止させます。
ここでは期待されたページが読み込まれていることを確認するために使っています。
driver.title(ページタイトル)に「Selenium」が含まれていることを想定したコードになっています。
ちなみにわざと誤った文字列を指定した場合はAssertionErrorが返ります。
>>> assert 'aaaa' in driver.title
Traceback (most recent call last):
  File "<python-input-24>", line 1, in <module>
    assert 'aaaa' in driver.title
           ^^^^^^^^^^^^^^^^^^^^^^
AssertionError
elem = driver.find_element(By.ID, 'm-documentationwebdriver')
elem.click()ページの中から「m-documentationwebdriver」というIDを持つ要素を探して、そのURLをクリックさせています。
ブラウザ上は新しいページが読み込まれます。

assert 'WebDriver' in driver.title先程と同様に期待したページが読み込まれているかを、assert文で判定します。
driver.quit()最後に起動したブラウザを終了します。
Firefoxドライバを利用する場合
Firefoxについては事前にインストールしていなかったのですが、こちらも問題なく動作しました。
ドライバが見つからないというエラーが返ってきた場合は、下記の「Edgeドライバを利用する場合」を参考に、ドライバを利用できるようにしてから試してみてください。
サンプルコードは以下です。
Firefoxの場合は「driver = webdriver.Firefox()」を指定します。
from selenium import webdriver
from selenium.webdriver.common.by import By
driver = webdriver.Firefox()
driver.get('https://selenium.dev/documentation')
assert 'Selenium' in driver.title
elem = driver.find_element(By.ID, 'm-documentationwebdriver')
elem.click()
assert 'WebDriver' in driver.title
driver.quit()以下のようなブラウザが表示されます。

Edgeドライバを利用する場合
from selenium import webdriver
from selenium.webdriver.common.by import By

driver = webdriver.Edge()

driver.get('https://selenium.dev/documentation')
assert 'Selenium' in driver.title

elem = driver.find_element(By.ID, 'm-documentationwebdriver')
elem.click()
assert 'WebDriver' in driver.title

driver.quit()
Edgeを利用する場合は、デフォルトではドライバがインストールされていないため、個別にインストールする必要があります。
実際にEdgeを使用しようとすると、ドライバが見つからないというエラーが返ってきますので、まずはEdgeドライバを入手します。
>>> from selenium import webdriver
>>> driver = webdriver.Edge();
  :
    raise NoSuchDriverException(msg) from err
selenium.common.exceptions.NoSuchDriverException: Message: Unable to obtain driver for MicrosoftEdge; For documentation on this error, please visit: https://www.selenium.dev/documentation/webdriver/troubleshooting/errors/driver_location
エラーメッセージに出力されている
https://www.selenium.dev/documentation/webdriver/troubleshooting/errors/driver_location
に、ドライバのダウンロードリンクがありますので、Edgeドライバをダウンロードします。
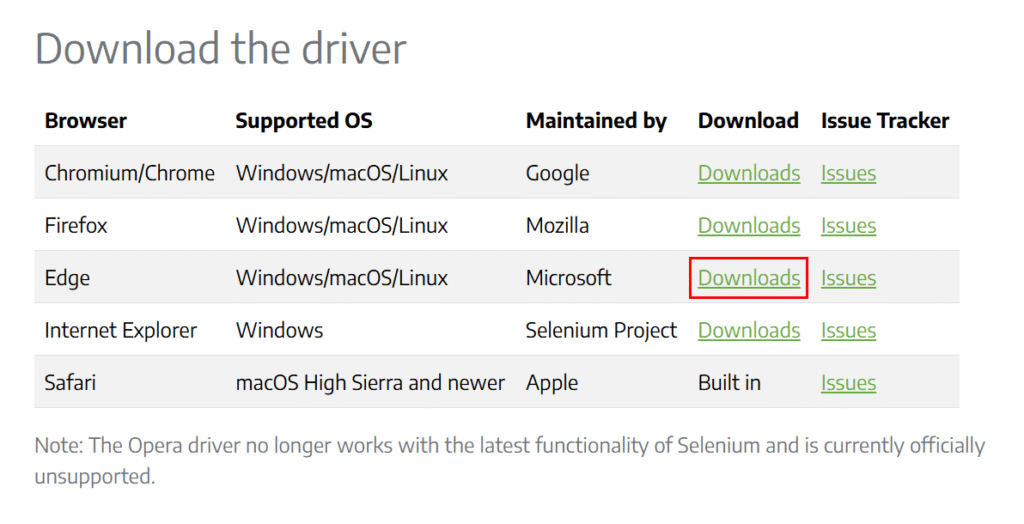
Microsoft Edge WebDriverページが開きますので、Windows 64bitの場合は、Stable Channel内の「x64」リンクをクリックしてください。
BETA(ベータ)版やDEV(開発版)もありますが、Stable(安定版)で大丈夫です。
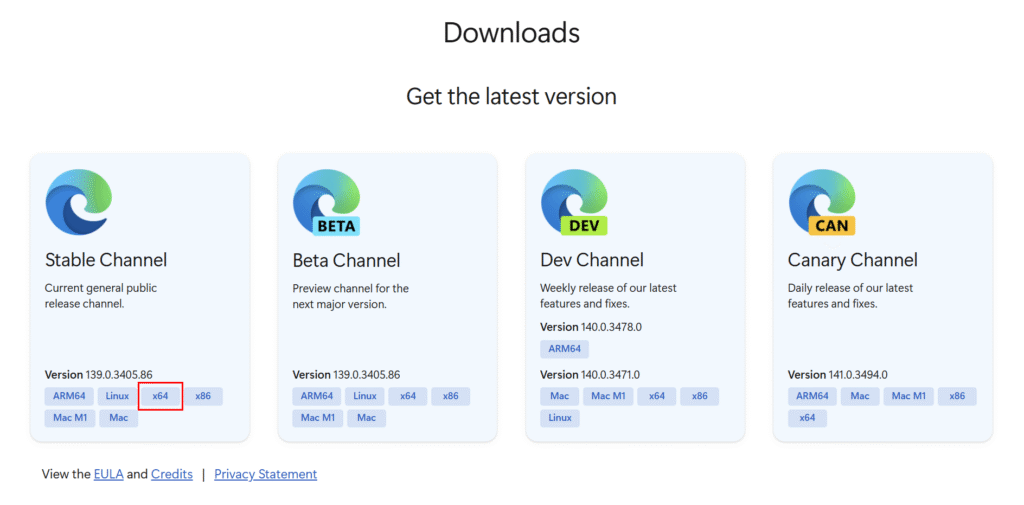
Edgeドライバがダウンロードされます。
(2025年8月現在だと edgedriver_win64.zip というファイル名です)
次にダウンロードしたEdgeドライバを使えるようにする必要があります。
いくつか方法はありますが、Windows環境の場合はPATH環境変数を使った方が手っ取り早そうです。
ダウンロードしたzipファイルを解凍すると、msedgedriver.exe というファイルがあります。
まずはこのファイルを任意のフォルダ(ここでは C:\tools\driver とします)にコピーし、PATH環境変数に「C:\tools\driver」を追加します。
PATH環境変数の設定が分かりづらいので載せておきます。
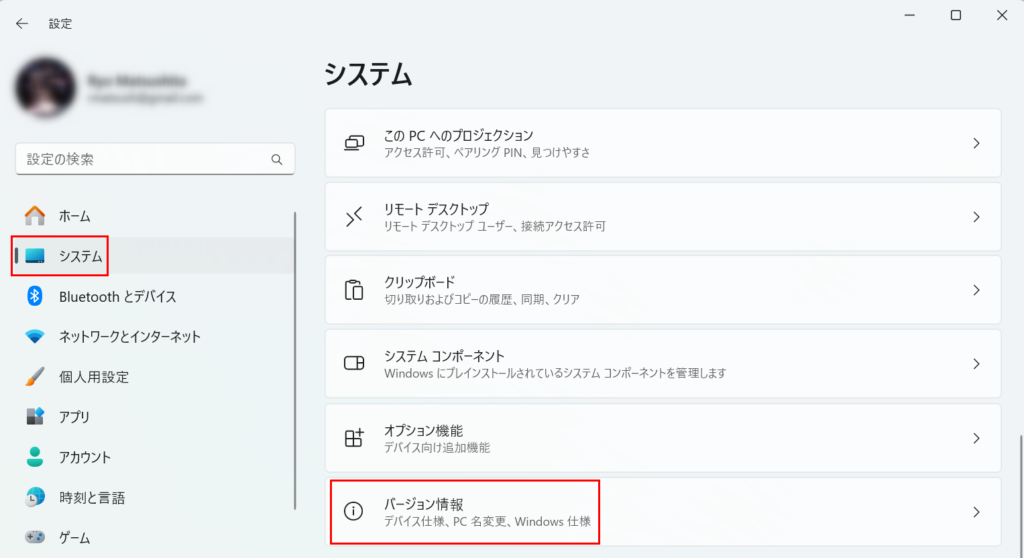
まずはWindowsスタートメニューから「設定」を選択します。

「システム」から「バージョン情報」を選択します。
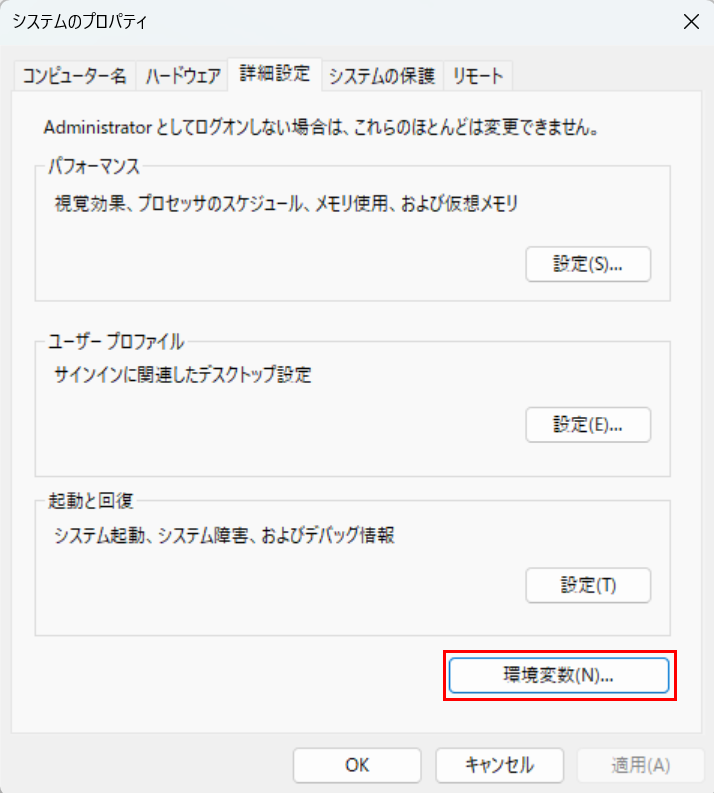
関連リンクから「システムの詳細設定」を選択します。

システムのプロパティが表示されますので、「環境変数(N)…」を選択します。
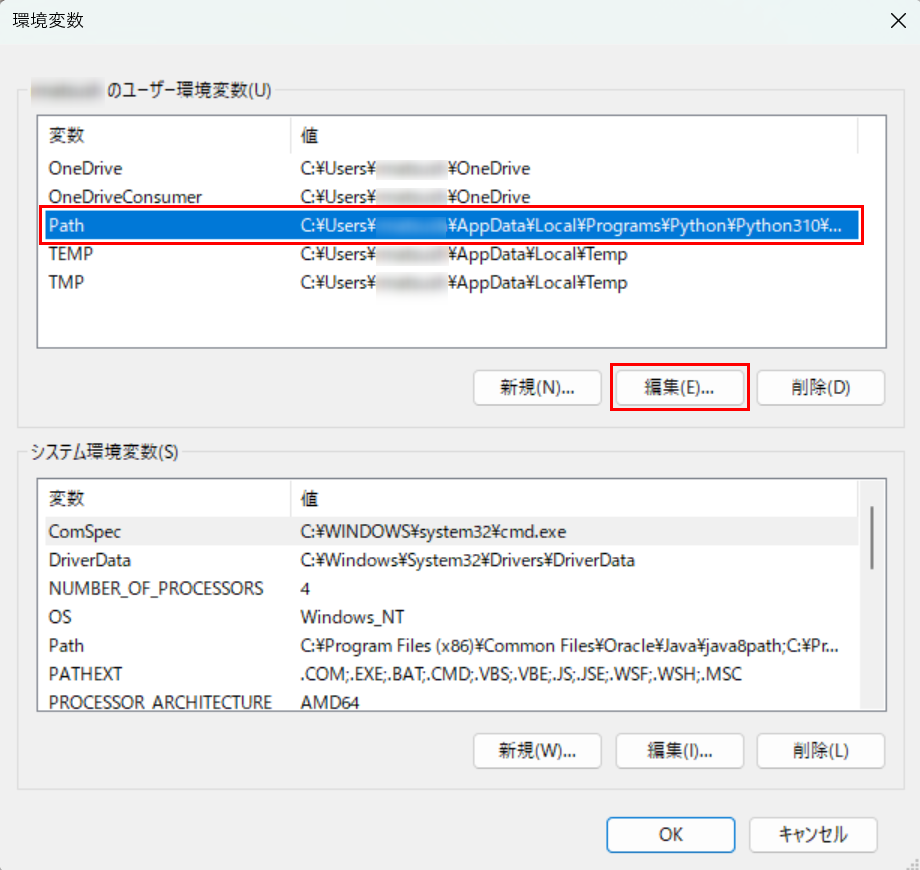
環境変数一覧が表示されますので、Pathを選択して「編集(E)…」を選択します。
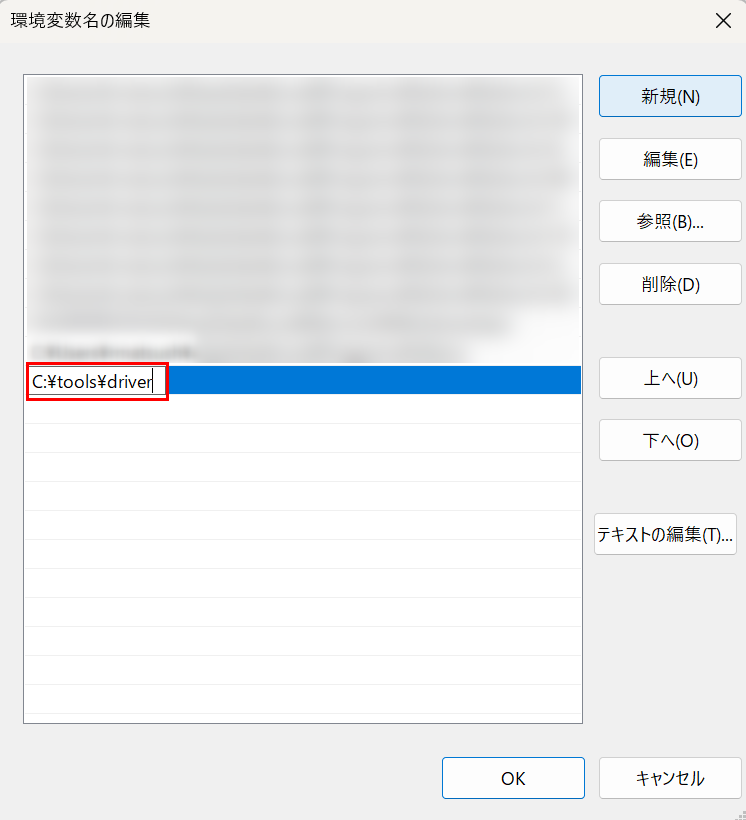
Path環境変数の編集画面が開きますので、「新規(N)」を選択します。
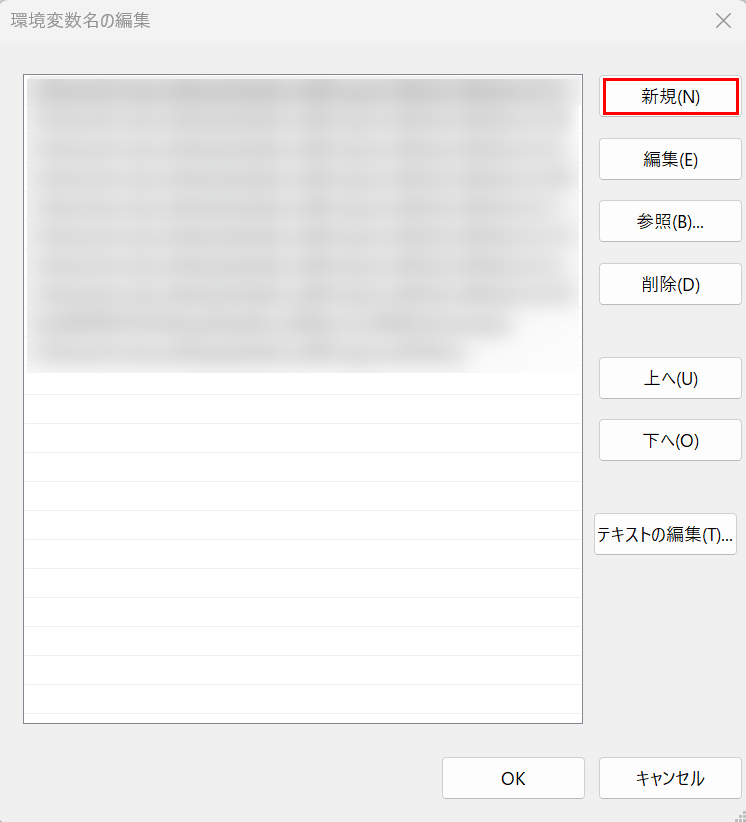
最後の行が編集モードになりますので、追加したいパスを入力(ここではC:\tools\driver)して、エンターキーを入力します。
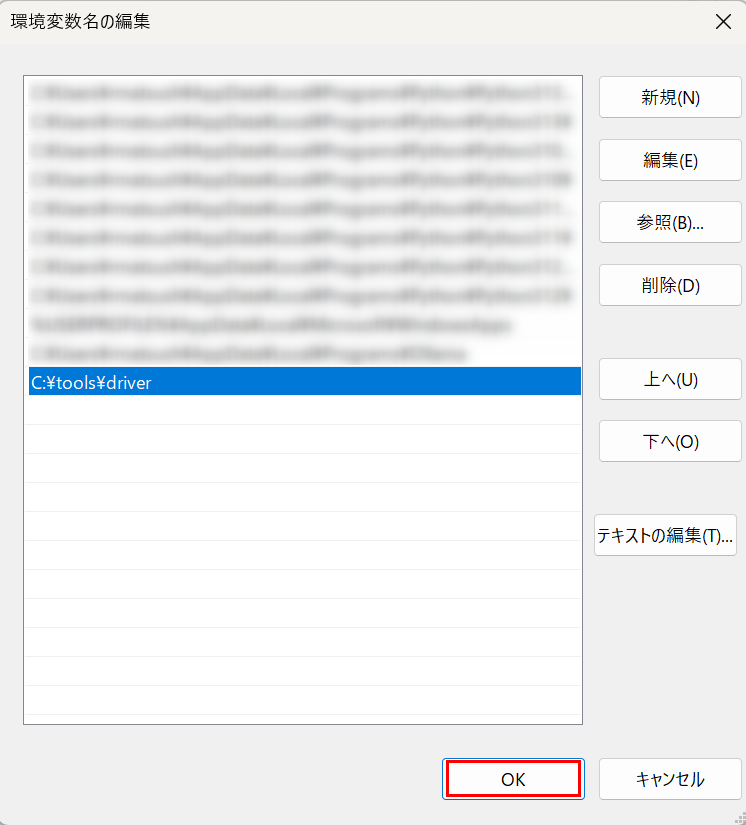
追加が完了しましたので「OK」をクリックすれば完了です。
他のウィンドウが開いた状態になっていますが、すべて閉じて大丈夫です。
サンプルコードを実行すると、エラーなくEdgeブラウザが表示されるようになります。

Safariドライバを利用する場合
Windows環境の場合、Safariドライバは利用できません。
どうしてもSafariで操作したい場合は、Mac環境を用意する必要があります。
  :
    raise NoSuchDriverException(msg) from err
selenium.common.exceptions.NoSuchDriverException: Message: Unable to obtain driver for safari; For documentation on this error, please visit: https://www.selenium.dev/documentation/webdriver/troubleshooting/errors/driver_location
まとめ
非常に簡単なサンプルではありますが、Seleniumパッケージのインストールから各ドライバの使い方までを解説しました。
Webスクレイピングや自動テストで使えることもそうですが、例えばRestAPIが用意されていないサイトの情報を取得する場合などにも活用できそうです。
コメント